
Technology trends, insights, success
stories and other helpful resources.
Data Upgrade from NAV 2013 to NAV 2018 CU5
In this blog, we will discuss about Data Upgrade from NAV 2013 to NAV 2018 CU5 (Build 21836).
Task 1: Prepare the old database
1) Use the Microsoft Dynamics NAV 2013 Development Environment to build all application objects

2) Unlock all application objects
Filter – Locked True in object designer.
Select all Locked Objects and From File Select Force Unlock.
3) Synchronize the database schema by compiling all Objects
Task 2: Create a full SQL backup of the NAV 2013 database on SQL Server
Task 3: Uninstall all V1 extensions
As it is an NAV 2013 database there are no Extensions so skip this step.
Task 4: Upload the Microsoft Dynamics NAV 2018 license to the NAV 2013 database
– In the NAV 2013 development environment, on the File menu, point to Database, and then choose Alter.
– In the Alter Database window, choose Integration, and then select Save license in database.
– Restart Microsoft Dynamics NAV 2013 Server instance
Task 5: Delete all objects except tables from the NAV 2013 database
– Select All Objects in Object Designer and Mark All Objects
– Select Tables in Object Designer, Select All and UN-mark all tables
– From View Select Marked only and select all in Object Designer
– Delete all Objects (marked Objects)
Task 6: Uninstall (optional) the old product (NAV 2013) and install the new product (NAV 2018 CU 5)
– Along with Installation of NAV 2018 CU 5, create a service for NAV 2018 CU 2
– Increase the SQL Command Time Out from 00:30:00 to 20:00:00 for both Services (One Service for NAV 2018 CU 2 and one Service for NAV 2018 CU 5)
Task 7: Clear Dynamics NAV Server instance and debugger breakpoints records from NAV 2013 database
1) Stop NAV 2013 Service
2) Using SQL Server Management Studio, open and clear the dbo.Server Instance and dbo.Debugger Breakpoint tables of the NAV 2013 database
DELETE FROM [NAV2018_TEST].[dbo].[Server Instance]
DELETE from [NAV2018_TEST].[dbo].[Debugger Breakpoint]
where NAV2018_TEST is my Databasename
Task 8: Convert the NAV 2013 database to the Microsoft Dynamics NAV 2018 CU 2 Database
– Open NAV 2018 CU 2 Developer Environment – Run as Administrator
– Open the NAV 2013 database in NAV 2018 CU 2 Development Environment
– Follow the conversion instructions
– Important: Do not run schema synchronization at this time
Task 9: Import the upgraded application objects (NAV 2018 CU 2) and upgrade toolkit objects into the converted database
– Import Merged objects from NAV 2018 CU 2 Object Merge in the database. (Select Replace all)
– Do not run table synchronization (Select Later if asked)
– Import Upgrade Toolkit Objects (Upgrade7001100.fob) in Database
– Do not run table synchronization (Select Later if asked)
Task 10: Connect a Microsoft Dynamics NAV 2018 CU 2 Server instance to the converted database
– Connect to NAV 2018 CU 2 service that we created in Task 6
Task 11: Compile all objects that are not already compiled
– Filter Objects with compiled false
– Compile objects with Synchronization Schema Later
If you get errors on the following table objects, use the Object Designer to delete the objects because they are no longer used.
Table 470 Job Queue (replaced by the Task Scheduler)
Table 824 DO Payment Connection Details
Table 825 DO Payment Connection Setup
Table 827 DO Payment Credit Card
Table 828 DO Payment Credit Card Number
Table 829 DO Payment Trans. Log Entry
Table 1510 Notification Template
When you delete following table object, in the Delete confirmation dialog box, set the Synchronize Schema option to Force.
– Test Runner Codeunits
Codeunit – 130400 – CAL Test Runner
Codeunit – 130402 – CAL Command Line Test Runner
OnBeforeTestRun – Verify parameter FunctionTestPermissions

OnAfterTestRun – Verify parameter FunctionTestPermissions

Task 12: Run the schema synchronization on the imported objects – NAV 2018 CU 2
From Tools – Sync. Schema for all Tables – With Validation
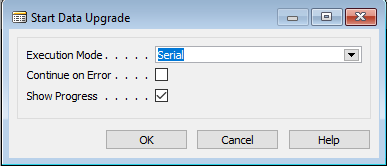
Task 13: Run the data upgrade process – NAV 2018 CU 2
– Open NAV 2018 CU 2 Development Environment as an administrator.
– On the Tools menu, choose Data Upgrade, and then choose Start and follow the instructions.
– To view the progress of the data upgrade, on the Tools menu, choose Data Upgrade, and then choose Show Progress.
(Below Tasks A to I are for NAV 2018 CU 2 ==> NAV 2018 CU 5)
Task A: Create a full SQL backup of the NAV 2018 CU 2 database on SQL Server
Task B: Stop NAV 2018 CU 2 Service
Task C: Convert the NAV 2018 CU 2 database to the Microsoft Dynamics NAV 2018 CU 5 Database
– Open NAV 2018 CU 5 Developer Environment – Run as Administrator
– Open the NAV 2018 CU 2 database in NAV 2018 CU 5 Development Environment
– Follow the conversion instructions
– Important: Do not run schema synchronization at this time
Task D: Import the upgraded application objects (NAV 2018 CU 5) into the converted database
– Import Merged objects from NAV 2018 CU 5 Object Merge in the database. (Select Replace all)
– Do not run table synchronization (Select Later if asked)
– Do not run table synchronization (Select Later if asked)
Task E: Connect a Microsoft Dynamics NAV 2018 CU 5 Server instance to the converted database
– Connect to NAV 2018 CU 5 service that we created in Task 6
Task F: Compile all objects that are not already compiled
– Filter Objects with compiled false.
– Compile objects with Synchronization Schema Later
Task G: Run the schema synchronization on the imported NAV 2018 CU 5 objects
From Tools – Sync. Schema for all Tables – With Validation
Task H: Run the data upgrade process – NAV 2018 CU 5
– Open NAV 2018 CU 5 Development Environment as an administrator.
– On the Tools menu, choose Data Upgrade, and then choose Start and follow the instructions.
– To view the progress of the data upgrade, on the Tools menu, choose Data Upgrade, and then choose Show Progress
Task I: Create a full SQL backup of the NAV 2018 CU 5 database on SQL Server
Task 14: Import upgraded permission sets and permissions by using the Roles and Permissions XML ports
Task 15: Set the language of the customer database
In the development environment, choose Tools, choose Language, and then select the language of the original customer database.
Task 16: Register client control add-ins
– To use these add-ins, they must be registered in table 2000000069 Client Add-in.
Microsoft.Dynamics.Nav.Client.BusinessChart
Microsoft.Dynamics.Nav.Client.DynamicsOnlineConnect
Microsoft.Dynamics.Nav.Client.FlowIntegration
Microsoft.Dynamics.Nav.Client.OAuthIntegration
Microsoft.Dynamics.Nav.Client.PageReady
Microsoft.Dynamics.Nav.Client.PingPong
Microsoft.Dynamics.Nav.Client.SocialListening
Microsoft.Dynamics.Nav.Client.TimelineVisualization
Microsoft.Dynamics.Nav.Client.VideoPlayer
Microsoft.Dynamics.Nav.Client.WebPageViewer
Task 17: Publish and install/upgrade extensions
Database = nav2018_test
Server Instance = nav2018_test
Database Server = NAVDB
You can find Extensions in NAV 2018 CU 5 DVD ==> ..\NAV.11.0.21836.W1.DVD\Extensions\
My Folder Path = C:\Prerequisites\Extensions\
You can download Microsoft_Application_11.0.19738.0.app from here.
You can find ModernDev in NAV 2018 CU 5 DVD
..\NAV.11.0.21836.W1.DVD\ModernDev\program files\Microsoft Dynamics NAV\110\Modern Development Environment
My Folder Path = C:\Prerequisites\Extensions\ModernDev
1. Open Microsoft Dynamics NAV Administration Shell – Run as Administrator
Run below commands:
Publish-NAVApp -ServerInstance nav2018_test -Path “C:\Prerequisites\Extensions\ModernDev\System.app” -PackageType SymbolsOnly
Publish-NAVApp -ServerInstance nav2018_test -Path “C:\Prerequisites\Extensions\ModernDev\Test.app” -PackageType SymbolsOnly
Publish-NAVApp -ServerInstance nav2018_test -Path “C:\Prerequisites\Extensions\ModernDev\Microsoft_Application_11.0.19738.0.app” -PackageType SymbolsOnly
2. Update Custom Setting file parameter “EnableSymbolLoadingAtServerStartup” = True
3. Restart Microsoft Dynamics NAV 2018 CU 5 Server instance
4. Generate the application symbol references for running Running C/SIDE and AL Side-by-Side
5. Open command prompt – Run as Administrator
Run below command:
cd “C:\Program Files (x86)\Microsoft Dynamics NAV\110\RoleTailored Client”
finsql.exe Command=generatesymbolreference, Database=nav2018_test, ServerName=NAVDB
Verify results after 5 minutes at location
C:\Program Files (x86)\Microsoft Dynamics NAV\110\RoleTailored Client\navcommandresult.txt
“[0] [07/07/18 3:08:25 AM] The command completed successfully in ‘268’ seconds.”
6. V1 extensions have the file type .navx. V2 extensions have the file type .app
7. Open Microsoft Dynamics NAV Administration Shell – Run as Administrator
Run below commands:
For V1 Extensions:
Publish-NAVApp -ServerInstance nav2018_test -Path “C:\Prerequisites\Extensions\Ceridian.navx”
Publish-NAVApp -ServerInstance nav2018_test -Path “C:\Prerequisites\Extensions\MSWalletPayments.navx”
Publish-NAVApp -ServerInstance nav2018_test -Path “C:\Prerequisites\Extensions\PayPalPaymentsStandard.navx”
Publish-NAVApp -ServerInstance nav2018_test -Path “C:\Prerequisites\Extensions\QuickBooksDataMigration.navx”
Publish-NAVApp -ServerInstance nav2018_test -Path “C:\Prerequisites\Extensions\QuickbooksPayrollFileImport.navx”
Publish-NAVApp -ServerInstance nav2018_test -Path “C:\Prerequisites\Extensions\SalesAndInventoryForecast.navx”
For V2 Extensions:
Publish-NAVApp -ServerInstance nav2018_test -Path “C:\Prerequisites\Extensions\C52012DataMigration.app”
Publish-NAVApp -ServerInstance nav2018_test -Path “C:\Prerequisites\Extensions\ImageAnalysis.app”
For V2 Extensions – Sync
Sync-NAVApp -ServerInstance nav2018_test -Name “C5 2012 Data Migration” -Version 1.0.21836.0
Sync-NAVApp -ServerInstance nav2018_test -Name “Image Analyzer” -Version 1.0.21836.0
Task 18: Update the Dynamics NAV Web client configuration file (navsettings.json)
If you have installed the Microsoft Dynamics NAV Web Server components, populate the navsettings.json file for the Dynamics NAV Web Server instance with the settings of the NAV 2013 web.config file.
NAV 2013 – web.config file
NAV 2018 CU 5 – NAVSettings.JSON file
Task 19: Delete the upgrade objects
– At this point, we have upgraded the database to Microsoft Dynamics NAV 2018 CU 5.
– Now, you can delete the upgrade code units and upgrade table objects that you imported in task 9. This task is recommended but not required.
– Filter Objects with Version Tag – UPGTK11.00.00 and delete objects with Force
Here are the Microsoft blogs you can refer: Data Upgrade and Upgrading to Dynamics NAV
Was this helpful? Let us know in comments. You can get more such insights into NAV here.
About Intech
Intech Systems is a three-cloud Microsoft-certified partner that boasts deep expertise in providing digital transformation solutions for organizations by leveraging the Microsoft 365, Dynamics 365, and Azure solution stack. Intech is recognized as a top-tier Microsoft implementation partner globally and specializes in transformative technology solutions such as ERP (Enterprise Resource Planning), CRM (Customer Relationship Management), Business Process Automation, Business Intelligence, Cloud Infrastructure, Data Management, Productivity & Collaboration and Generative AI (Gen-AI) solutions. As a trusted Microsoft Solutions Partner, we are capable of doing complex technology implementations catered to an organization’s specific needs & also rapid solution implementation such as our Microsoft Dynamics 365 Business Central implementation packages. We pair our implementations with end-to-end customer support, offshore development & 3rd party integrations. With offices in India, USA (United States of America), and Singapore, we work with clients across globe to empower businesses with cutting-edge technology solutions. Our latest services aim at delivering business ready AI solutions to the customer, like our Microsoft Copilot Consulting Services & Solutions for small, medium & large enterprises. Intech’s expertise lies in building software solutions for Manufacturing, Professional Services & Healthcare. Our Dealer Management System, Sales and Service CRM for Manufacturing, Field Force Automation for Pharmaceuticals and Manufacturing Central are some of our leading industry solutions. Intech’s vision is to catalyze digital futures for operation-centric industries globally, we are at the forefront of innovation, helping organizations drive growth and innovation like never before. Contact Us to learn more.
Recent Post


How can we help? - Talk to Dynamics 365 experts for your concerns
What's New
Top Reasons to Replace Dynamics GP with Business Central [2025]
Introduction: The clock is ticking for businesses still operating on Microsoft Dynamics GP. While it...

How AI Agents Are Redefining the Market Research Landscape
Do you know your competitors are decoding consumer behavior in hours using AI agents that...

How Agentic AI Is Transforming the Manufacturing Industry [2025]
Introduction Did you know that 91% of manufacturers are planning to increase their investment in...